
Never Ever Do This

 One of my teacher’s said this to me when I asked how to make and prepare my own panels for oil painting. Have you ever had someone say this to you? Any recollection of your reaction to this kind of comment? Whenever I hear this question, I think, “I am so doing this!”
So, I learned this year that I LOVE painting on panels. In fact, I like panels so much more than canvas. Why? Because there’s no springing on the fabric. And, there’s a solid feeling and a smooth sensation when I paint on a panel. There are huge challenges to painting on panel. For instance, I have heard people say that panels are not as ‘forgiving’ as canvas. I am not sure this is an issue for me yet because I am still developing my technical capabilities as a painter. The other challenge to painting on panels is that they are expensive; very very expensive. For instance, a 16 x 20 (insert brand name here) panel is listed for $20. I have used these beautiful name brand panels. I kept thinking there must be a more sensible, economical solution. And, guess what? There is!
One of my class mates sent me a link with step-by-step instructions from Stapleton Kearns’ blog. I am out of school for the summer and have decided this is a fabulous time to experiment and make my own panels. So, I made a list of materials to buy. Then I drew out the dimensions of the hardboard I would buy at the big box hardware store (price: $8).
The scariest part of this process for me is using a table saw. Why? Well I can be a bit of a klutz. This is not a good characteristic to have when using a whirring blade and chunks of hardboard. So, I enlisted the help of my patient spouse who has amazing and handy power tool skills. He showed me how to look at the board as it runs against the ‘fence’ of the table saw. Yay!
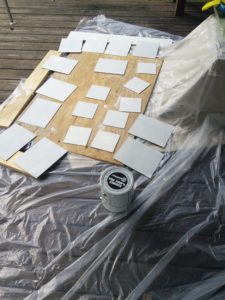
Next I followed the steps to apply oil based primer to the boards. You can see these boards in the photograph above. I applied two coats to each board and then let them dry indoors for 48 hours. Why? It is so humid here in North Carolina. I wanted to make sure the boards were dry before sanding. I sanded the boards a few days later. I compared the feel of the boards to a ‘store bought’ panel. Although my boards are a bit more rough, I am surprised at how smooth they feel.
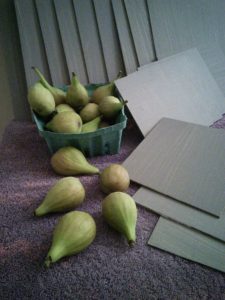 Today I applied the neutral grey acrylic ground to the panels. Here’s a photo of the panels, all lined up like soldiers. Oh, and I included a carton of figs that I picked from my neighbor’s fig tree. Don’t they look delicious? And, they will be a delightful subject for a painting on one or two of my panels.
I have heard that these ‘homemade’ panels present all kinds of problems. They can be too absorbent. They can also be too slick. But I figure if an expert landscape painter like Stapleton Kearns can make his panels and provide step-by-step instructions, then I can, at least, experiment. So, I will give you an update of my experience with these panels as I use them this summer.
Stay tuned and feel free to share some experiments you have conducted. Especially if your experiment has been as a result of someone telling you, “Never ever do this!”
1 Comment
Julie Holmes, Fine Artist Pushing the Envelope - Julie Holmes, Fine Artist
July 28, 2016[…] primer on the ‘test’ panels two weeks ago. See my original description of this project here. Thankfully, I had some more unprimed panels and that is what I prepared this […]